 Contattore,interruttore automatico,inverter solare,contatore elettrico,batterie solari


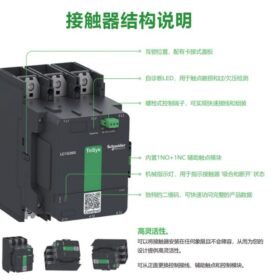
3-contattore a due poli dalla serie domestica TeSys Giga, CA‑3 475 A/440 V, bobina da 100–250 V CA/CC ampia tensione, contatti ausiliari standard 1NO+1NC. Adatto per il controllo di motori ad alta potenza e la commutazione di potenza. Supporta la diagnosi dell'usura dei contatti e può essere utilizzato con i relè termici della serie LR9G.
1 Parametri di base & Spiegazione dei nomi
| Articolo | Specifica | Descrizione |
| Modello | LC1G475KUEC | Serie domestica TeSys Giga, 3P(3NO), CA‑3 ≤440 V 475 A, 100–Bobina da 250 V CA/CC |
| Serie | TeSysGiga (LC1G) | Contattore ad alta potenza di nuova generazione di Schneider, sostituisce il vecchio LC1D475 |
| Poli | 3P(3NO) | 3-polo normalmente aperto, per il controllo del circuito trifase |
| Corrente nominale | 475UN (AC‑3, ≤440 V) | Corrente operativa nominale del circuito principale |
| Tensione della bobina | 100–250 V CA/CC | Design ad ampio voltaggio, compatibile con vari alimentatori di controllo |
| Frequenza della bobina | 50/60Hz | Compatibile con le frequenze di rete globali |
| Contatti ausiliari | 1NA+1NC | Configurazione standard, espandibile con più contatti aux |
| Norme applicabili | IEC 60947‑4‑1, GB/T 14048.4 | Conforme agli standard internazionali e nazionali |
| Versione | Versione cinese (suffisso C) | Progettato per il mercato interno; nessuna certificazione UL; versione globale senza C |
2 Dati chiave sulle prestazioni
| Categoria di utilizzo | Potenza nominale (400V) | Potenza nominale (440V) | Corrente di breve durata |
| AC‑3 (normale avviamento/funzionamento del motore) | ca. 250kW | ca. 265kW | 10500UN (1S) |
| AC-4 (avviamenti/inversioni frequenti) | ca. 180kW | ca. 190kW | – |
| AC‑1 (carico resistivo) | ca. 475kW | ca. 475kW | – |
3 Applicazioni & Caratteristiche
Applicazioni
Avviamento diretto, controllo avanti/indietro, avviamento stella-triangolo di motori asincroni trifase di elevata potenza
Controllo del sistema di commutazione e distribuzione dell'energia industriale
Controllo del carico induttivo con fattore di potenza ≥ 0.95
Industrie pesanti: edificio elettrico, metallurgia, chimico, minerario, ecc.
Caratteristiche principali
- Alte prestazioni: Fino a 620 A con AC‑3, 1050A su AC‑1 per applicazioni pesanti
- Diagnosi intelligente: Rilevamento dell'usura dei contatti integrato per la manutenzione predittiva
- Bobina ad ampio voltaggio: 100–250 V CA/CC riduce l'inventario dei pezzi di ricambio
- Progettazione modulare: Supporta vari accessori (ai contatti, interblocco meccanico, soppressore di sovratensioni, ecc.)
- Sicuro & affidabile: Eccellente estinzione dell'arco, adatto per ambienti industriali difficili
4 Montaggio & Informazioni sul cablaggio
Dimensioni di montaggio (Versione cinese LC1G475C)
Larghezza: ca. 140mm
Altezza: ca. 270mm
Profondità: ca. 150mm
Montaggio: Montaggio su guida DIN standard da 35 mm o con viti
Peso: ca. 10.6kg
Requisiti di cablaggio
- Terminali del circuito principale: Adatto per cavi in rame/alluminio; si consiglia di crimpare i capicorda
- Terminali del circuito di controllo: Adatto per cavi di controllo da 1,5–2,5 mm²
- Liquidazione: ≥50mm a sinistra & Giusto, ≥100mm superiore & fondo per una corretta dissipazione del calore
5 Compatibilità degli accessori & Prodotti corrispondenti
| Tipo di accessorio | Modello consigliato | Funzione |
| Relè termico | LR9G475 | Corrisponde a LC1G475KUEC, fornisce protezione da sovraccarico del motore |
| Interblocco meccanico | Per la serie LC1G | Per il controllo avanti/indietro; impedisce la chiusura simultanea |
| Soppressore di sovratensioni | Per la serie LC1G | Protegge la bobina dai picchi di tensione |
| Modulo contatti ausiliari | Per la serie LC1G | Espande i contatti NO/NC per un controllo complesso |
6 Alternative multimarca
| Marca | Modello sostitutivo | Livello della partita | Note |
| ABB | AF460‑30‑11 (100–250 V CA/CC) | Alto | Potenza nominale 460A, vicino a 475A; verificare il margine di carico |
| Siemens | 3RT2076‑6AP36 (100–250 V CA/CC) | Alto | Serie Sirio, 475UN, pienamente compatibile |
| Cinto | CJX1‑475/22 (100–250 V CA/CC) | Medio | Alternativa domestica; lievi differenze di prestazioni, conveniente |
| Interruttore Changshu | CK3‑475 (100–250 V CA/CC) | Medio | Marchio nazionale premium, costo-prestazioni elevate |
7 Installazione & Suggerimenti per la messa in servizio
- Ispezione pre-installazione
Verifica modello, i parametri nominali e la corrispondenza dell'alimentazione di controllo
Controlla eventuali danni fisici, ossidazione da contatto
Garantire una superficie di montaggio piana e una guida sicura
- Passaggi di installazione
Guida DIN: Allineare alla guida da 35 mm, premere con decisione finché non si blocca
Montaggio a vite: Utilizzare viti M6, coppia 8–10 N·m
Cablaggio: Main circuit first, then control circuit; observe terminal torque
- Messa in servizio & testing
No‑load test: Apply control power; check smooth operation, abnormal noise
Load test: Run under load; monitor current, coil temperature
Aux contact test: Verify NO/NC switching and contact resistance
- Maintenance recommendations
Regularly inspect contact wear; replace if wear >1mm
Clean arc chamber; remove dust and metal particles
Check coil insulation resistance ≥1MΩ
Retighten all terminals to avoid overheating
8 Note sulla selezione
- Select contactor according to load type (AC‑3/AC‑4/AC‑1)
- For motor control: Contactor rated current ≥ 1.1 × motor rated current
- For frequent starting/reversing (AC-4): Derate by 20–30%
- For unstable control supply: Prefer wide‑voltage coil models
- When used with thermal relay: Ensure matching ratings
Manuale di installazione – Contattore tripolare Schneider Domestic TeSys LC1G475KUEC
Doc n.: DOCA0189ZH‑04 (basato sulla guida di installazione ufficiale di Schneider TeSys Giga)
Modello applicabile: LC1G475KUEC (contattore domestico TeSys Giga tripolare)
Versione: Gennaio 2023
⚠️ Avvertenze di sicurezza (Deve leggere)
| Tipo di pericolo | Misure preventive |
| Scossa elettrica / esplosione / pericolo di arco elettrico | 1. Scollegare tutta l'alimentazione (principale e di controllo) prima dell'installazione |
| 2. Possono operare solo elettricisti qualificati | |
| 3. Utilizzare DPI adeguati | |
| 4. Rispettare i codici di sicurezza elettrica (per esempio., NFPA70E) | |
| 5. Installare in aree non pericolose (CEI 60079) | |
| Pericolo di lesioni meccaniche | 1. Contattore ca. 10.6kg; supporto durante l'installazione |
| 2. Evitare lo schiacciamento delle dita tra il contattore e la piastra/guida di montaggio | |
| 3. Utilizzare strumenti adeguati per evitare lesioni da scivolamento | |
| Pericolo di surriscaldamento | 1. Mantenere le distanze richieste: Lati ≥50mm, ≥100mm superiore/inferiore |
| 2. Non conservare sostanze infiammabili vicino al contattore | |
| 3. Ispezionare regolarmente il raffreddamento |
1 Panoramica del prodotto
1.1 Identificazione del prodotto
Modello: LC1G475KUEC
Serie: Giga TeSys domestici (LC1G)
Poli: 3P (3NO, 3-polo normalmente aperto)
Corrente nominale: AC-3 475A (440V)
Tensione della bobina: 100–250 V CA/CC (ampia tensione)
Contatti ausiliari: 1NO+1NC standard
Standard: IEC 60947‑4‑1, GB/T 14048.4
Versione: Versione cinese (suffisso C; nessuna certificazione UL)
1.2 Dimensioni (Unità: mm)
| Dimensione | Valore |
| Larghezza | 140 |
| Altezza | 270 |
| Profondità | 150 |
| Distanza tra i fori di montaggio | 100×120 (appeso in basso + fori di fissaggio) |
2 Preparazione pre-installazione
2.1 Utensili
Cacciavite a croce (PH3)
Chiave esagonale (per dimensione della vite di fissaggio)
Chiave dinamometrica (5Portata –20N·m)
Spelafili (1.5–Controllo di 2,5 mm² & cavi principali di grandi dimensioni)
Strumento di crimpatura (per capicorda)
Multimetro (resistenza della bobina & controllo dell'isolamento)
Livella a bolla
2.2 Materiali
Piastra di montaggio (metallo, spessore ≥3mm, Piatto, senza sbavature)
Viti di montaggio M6 (min. 4 pz)
Capicorda (per i cavi del circuito principale)
Cavo di controllo (1.5–2,5 mm² di rame)
Cavo principale (Consigliato rame ≥150mm²)
Nastro isolante / guaina termorestringente
Evidenziatore
2.3 Requisiti ambientali
| Parametro | Requisito |
| Temperatura | -5°C~+40°C (operativo); -25°C~+55°C (magazzinaggio) |
| Umidità | ≤95% (senza condensa) |
| Altitudine | ≤2000m (declassare sopra) |
| Grado di inquinamento | 2 (ambiente industriale) |
| Vibrazione | ≤5,9 m/s2 (5–150 Hz) |
| Inclinazione | ≤30° dalla verticale |
2.4 Ispezione del prodotto
- Controllare l'imballaggio e i danni da trasporto
- Verificare l'etichetta del modello (LC1G475KUEC)
- Ispezionare i contatti per eventuali ossidazioni, vaiolatura, materia estranea
- Azionare manualmente l'armatura; check smooth operation
- Misurare la resistenza della bobina con un multimetro
- Testare la commutazione del contatto ausiliario
3 Procedura di installazione (Montaggio superficiale)
Nota: LC1G475KUEC domestico supporta solo il montaggio su superficie; non per guida DIN.
3.1 Foratura della piastra di montaggio (Opzionale)
- Segnare i fori a 100×120 mm
- Diametro del trapano: φ6,5 mm (per M6)
- Sbavare dopo la foratura
3.2 Sospeso & Fissaggio
- Appendere: Individuare i fori di sospensione inferiori sui perni/viti della piastra di montaggio
- Correzione preliminare: Stringere manualmente le viti M6 superiori
- Correzione finale: Coppia tutto 4 viti a 3±0,3 N·m (dall'alto al basso, diagonale)
- Controllo del livello: Garantire un'inclinazione ≤30°
3.3 Installazione degli accessori (Ai contatti / Interblocco meccanico)
- Contatti ausiliari
Scollegare l'alimentazione di controllo
Allineare e spingere nella fessura superiore fino allo scatto
Verificare il bloccaggio sicuro
- Interblocco meccanico
Mantenere ≥50mm tra due contattori
Montare l'interblocco sui lati
Regolare per evitare la chiusura simultanea
Prova manualmente
4 Procedura di cablaggio
4.1 Note di precablaggio
- Confermare che tutta l'alimentazione sia scollegata
- I cavi principali devono utilizzare capicorda a crimpare adeguati
- Controllare la lunghezza della striscia del cavo: ~8–10 mm
- Sequenza: Main circuit first, quindi controllo
4.2 Cablaggio del circuito principale (3P, L1/L2/L3 → T1/T2/T3)
- Aprire il coperchio del terminale principale
- Inserire i cavi con capicorda
- Coppia:
Rame: 12±1N·m
Alluminio: 14±1N·m (con antiossidante)
- Stringere saldamente; controllare tirando delicatamente
- Chiudere il coperchio dei terminali
4.3 Cablaggio del circuito di controllo (Bobina A1/A2, A NA/NC)
- Aprire il coperchio dei terminali di controllo
- Bobina:
A1: Alimentazione di controllo +/Linea
A2: Alimentazione di controllo –/Neutro
- Ai contatti:
NO: 13–14 (presa, indicazione)
NC: 21–22 (interblocco, colpa)
- Controllare la coppia del terminale: 2±0,2 N·m
- Chiudere il coperchio
4.4 Schema elettrico
5 Montaggio con Relè Termico (LR9G475)
5.1 Installazione diretta
- Conferma la corrispondenza: LC1G475KUEC + LR9G475
- Allineare il relè termico allo slot superiore
- Spingere verso il basso fino allo scatto
- Controllare il montaggio sicuro
- Collegare le sbarre preinstallate
- Coppia viti per sbarre collettrici: 8±0,8 N·m
5.2 Note sul cablaggio
- Principale: Alimentazione → Contattore → Relè termico → Motore
- Controllare: Relè termico NC (95–96) in serie alla bobina del contattore
- Impostare la corrente del relè termico sulla corrente nominale del motore
6 Messa in servizio & Test
6.1 Test a vuoto
- Apply control power (principale aperto)
- Controllare la chiusura regolare, nessun rumore anomalo
- Verificare la commutazione del contatto aux
- Controllare l'apertura rapida
- Ripeti 3-5 volte
6.2 Prova di carico
- Applicare l'alimentazione principale
- Avviare il motore; controllare la corrente entro i valori nominali
- Monitorare la temperatura della bobina ≤60°C dopo 1 ora
- Controllare la temperatura del terminale ≤70°C (infrarossi)
- Simulare il sovraccarico; verificare l'intervento del relè
6.3 Contattare la diagnosi dell'usura (Caratteristica LC1G)
- Monitoraggio tramite contatti ausiliari
- Avvertimento quando usura >1mm
- Sostituire tempestivamente il contattore
7 Manutenzione & Servizio
7.1 Ispezione di routine (ogni 6 mesi)
- Togliere la tensione; ispezionare lo sporco, danno
- Clean arc chamber (aria compressa ≤0,3 MPa)
- Controllare la resistenza del contatto ≤500μΩ
- Controllare l'isolamento della bobina ≥1MΩ (500V megger)
- Stringere nuovamente i terminali
- Prova di funzionamento
7.2 Programma di sostituzione
| Parte | Intervallo | Norma sostitutiva |
| Contatti principali | 1–2 anni | Indossare >1mm o resistenza >500mΩ |
| Ai contatti | 2–3 anni | Commutazione scadente |
| Bobina | 3–5 anni | Invecchiamento dell'isolamento, chiusura debole |
| Camera d'arco | 5 anni | Prestazioni degradate |
7.3 Risoluzione dei problemi
| Sintomo | Possibili cause | Soluzione |
| Il contattore non si chiude | 1. Nessun potere di controllo | 1. Controllare il cablaggio |
| 2. Guasto alla bobina | 2. Sostituire la bobina | |
| 3. Inceppamento meccanico | 3. Pulito & lubrificare | |
| Forte rumore in chiusura | 1. Nucleo di ferro sporco | 1. Superfici pulite |
| 2. Anello rotto | 2. Sostituire l'anello | |
| 3. Bassa tensione della bobina | 3. Controllare la fornitura | |
| Surriscaldamento dei contatti | 1. Terminali allentati | 1. Stringere nuovamente |
| 2. Contatti ossidati | 2. Pulire/sostituire i contatti | |
| 3. Sovraccarico | 3. Controllare il carico | |
| Apertura lenta | 1. Primavera affaticata | 1. Sostituire la molla |
| 2. Inceppamento meccanico | 2. Meccanismo pulito | |
| 3. Magnetismo residuo | 3. Controllare la bobina |
8 Sicurezza & Ambiente
8.1 Smaltimento sicuro
- Scollegare tutta l'alimentazione prima della rottamazione
- Rimuovere tutti i cavi
- Metallo separato & plastica da riciclare
- I contatti contengono lega d'argento; riciclare come metallo prezioso
8.2 Conformità ambientale
Conforme alla direttiva RoHS; esente da Pb, Hg, ecc.
Custodia in plastica riciclabile
Smaltire secondo le normative locali
9 Appendice – Dati Tecnici
| Parametro | Valore |
| Corrente operativa nominale (AC‑3, 400V) | 475UN |
| Potenza nominale (400V, AC‑3) | 250kW |
| Corrente di breve durata (1S) | 10500UN |
| Tensione della bobina | 100–250 V CA/CC |
| Potenza della bobina | Spunto: ~200VA, Sigillato: ~20 W |
| Corrente nominale del contatto ausiliario | 5UN (AC-15, 220V) |
| Vita meccanica | 10,000,000 operazioni |
| Vita elettrica (AC‑3) | 1,000,000 operazioni |


")

NH42-63-318x560.png "Commutatori automatici di tipo PC CHINT (ATS)NH42-63/4SZ")


