 Contattore,interruttore automatico,inverter solare,contatore elettrico,batterie solari


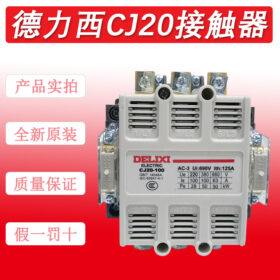

Delizioso Contattori CA sono dispositivi di controllo elettrici comunemente usati. Possono essere utilizzati per collegare e scollegare frequentemente circuiti CA e CC e sono ampiamente utilizzati nei sistemi di azionamento elettrico e di controllo automatico. Di seguito vengono introdotti i metodi di cablaggio comuni per i contattori CA Delixi.
Struttura e terminali di cablaggio del contattore CAPrezzo degli interruttori automatici Schneider
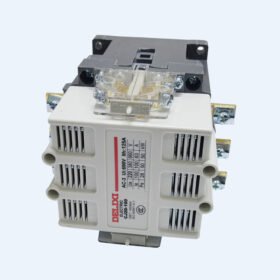
I contattori AC Delixi sono composti principalmente da contatti principali, contatti ausiliari, bobine, ecc. I terminali di cablaggio comuni sono i seguenti:
Contatti principali: Generalmente, "L1"., "L2"., e "L3" rappresentano i terminali in entrata, mentre "T1"., "T2", e "T3" rappresentano i terminali in uscita. Vengono utilizzati per collegare e scollegare il circuito principale e possono trasportare correnti relativamente elevate.
Contatti ausiliari: Sono suddivisi in contatti normalmente aperti (NO) e contatti normalmente chiusi (NC), che vengono utilizzati per la trasmissione del segnale e il controllo di interblocco nel circuito di controllo.
Bobina: Solitamente rappresentato da "A1" e "A2".. Quando la bobina è eccitata, i contatti principali e ausiliari del contattore si comporteranno di conseguenza.
Esempi di cablaggio comuniInterruttori automatici CC serie NB163DC di Chint Prezzo
- Cablaggio per l'avvio e il controllo di un singolo motore
Questo è lo scenario applicativo più comune, utilizzato per controllare l'avvio e l'arresto di un singolo motore.
Materiali richiesti: Contattore AC Delixi, interruttore automatico, relè termico, pulsante di avvio, pulsante di arresto, e motore.
Passaggi di cablaggio:Prezzo dei relè termici di sovraccarico serie Chint NXR
- Linea di alimentazione in entrata: Collegare i terminali di uscita dell'interruttore ai terminali di ingresso "L1"., "L2"., e "L3" dei contatti principali del contattore CA.
- Collegamento al circuito principale: Collegare i terminali in uscita `T1`, "T2", e "T3" dei contatti principali del contattore CA ai terminali di ingresso del relè termico, e collegare i terminali in uscita del relè termico al motore.
- Collegamento del circuito di controlloPrezzo contattore CHINT:
Disegnare una linea di controllo dal terminale di uscita dell'interruttore e collegarla a un'estremità del pulsante di arresto.
Collegare l'altra estremità del pulsante di arresto a un'estremità del pulsante di avvio, e collegare l'altra estremità del pulsante di avvio a un'estremità "A1" della bobina del contattore CA.
Collegare il contatto ausiliario normalmente aperto del contattore CA in parallelo al pulsante di avvio per ottenere una funzione autobloccante.
Collegare l'altra estremità "A2" della bobina del contattore CA a un'estremità del contatto normalmente chiuso del relè termico, e collegare l'altra estremità del contatto normalmente chiuso del relè termico all'altra fase dell'alimentazione.
- Cablaggio per il controllo della marcia avanti e della retromarciaPrezzo del dispositivo di protezione da sovratensione CHINT:
Viene utilizzato per controllare la rotazione avanti e indietro del motore, di solito richiedono due contattori CA.
Materiali richiesti: Due contattori AC Delixi, interruttore automatico, relè termico, pulsante di rotazione in avanti, pulsante di rotazione inversa, pulsante di arresto, e motore.
Passaggi di cablaggio:
- Collegamento al circuito principale: Collegare i terminali di uscita dell'interruttore rispettivamente ai terminali di ingresso dei contatti principali dei due contattori AC. Dopo aver invertito la sequenza di fase dei terminali di uscita dei contatti principali dei due contattori AC, collegarli ai terminali di ingresso del relè termico, e collegare i terminali in uscita del relè termico al motore.
- Collegamento del circuito di controllo:
Disegnare una linea di controllo dal terminale di uscita dell'interruttore e collegarla a un'estremità del pulsante di arresto.
Collegare l'altra estremità del pulsante di arresto rispettivamente a un'estremità del pulsante di rotazione in avanti e a un'estremità del pulsante di rotazione inversa.
Collegare l'altra estremità del pulsante di rotazione in avanti a un'estremità "A1" della bobina del contattore CA di rotazione in avanti. Collegare il contatto ausiliario normalmente aperto del contattore CA di rotazione avanti in parallelo al pulsante di rotazione avanti. Nel frattempo, collegare il contatto ausiliario normalmente chiuso del contattore AC con rotazione avanti in serie nel circuito di controllo della bobina del contattore AC con rotazione inversa.
Collegare l'altra estremità del pulsante di rotazione inversa a un'estremità "A1" della bobina del contattore CA di rotazione inversa. Collegare il contatto ausiliario normalmente aperto del contattore CA con rotazione inversa in parallelo al pulsante di rotazione inversa. Nel frattempo, collegare il contatto ausiliario normalmente chiuso del contattore AC con rotazione inversa in serie nel circuito di controllo della bobina del contattore AC con rotazione avanti.
Collegare l'altra estremità "A2" delle bobine di entrambi i contattori CA a un'estremità del contatto normalmente chiuso del relè termico, e collegare l'altra estremità del contatto normalmente chiuso del relè termico all'altra fase dell'alimentazione.
Precauzioni per il cablaggio
Spegnimento sicuro: Assicurarsi di spegnere l'alimentazione prima del cablaggio per evitare incidenti dovuti a scosse elettriche.
Conferma tensione: Assicurarsi che la tensione nominale della bobina del contattore sia coerente con la tensione di alimentazione del circuito di controllo.
Cablaggio corretto: Cablare rigorosamente secondo lo schema elettrico e il manuale del prodotto per garantire il corretto collegamento dei contatti principali, contatti ausiliari, e bobine.
Stringere i terminali: Dopo il cablaggio, controllare se tutti i terminali del cablaggio sono serrati per evitare uno scarso contatto causato dall'allentamento.


")

NH42-63-318x560.png "Commutatori automatici di tipo PC CHINT (ATS)NH42-63/4SZ")


